
Do you want to start a blog? Don’t know how to get started with blogging and make money? Here is a comprehensive guide to create your blog. Learn how to create a self-hosted blog with WordPress & your own web hosting.
In this blogging guide for beginners, you will have step-by-step instructions to create your first blog in just few minutes and start blogging. So, let’s get started to dazzle the world with our talent and awesome blog.
Step by Step Guide: How to Start a Blog?
Here’s the quick overview of how to create a blog using self-hosted WordPress.org platform (content management system).
- Choose your niche for blogging
- Select a domain name for your blog
- Get reliable web hosting
- Install WordPress on your hosting
- Customize your blog design
- Start blogging!
Choose Your Blogging Niche
Looking to start a blog? Your first step should be selecting the blogging niche.
What will be the topic or niche of your blog? A blog without a niche is like a headless chicken. Plan your blogging purpose before you start your blog.
Here are the broad point to consider when selecting the niche for your blog.
- Knowledge: You must have some knowledge or expertise in the niche. It could be via education, self learning or work experience.
- Interest: You should be interested in the topic that you want to blog about. You don’t have to be passionate, but need to have some interest.
- Passion: If you have a passion, does it align with your blogging niche.
- Earning Potential: A blog niche should also have the potential to generate adequate income. If there are advertisers and companies operating in the segment, you have a better chance of earning money from your blog in the niche.
- Demand / Search Volume: Are people searching for content on the topic about which you intent to start a blog? What is the monthly search volume for the main keywords in your niche. You can use Keyword Tool by Google Ads, Google Trends and Ahrefs Keyword Generator of check the average monthly search volume and trends.
Register a Domain Name
Once you have picked the niche for your blog, you need to register a domain name. The domain name is the website address such as speckygeek.com. Always register your domain with a reputed registrar. Some big names are GoDaddy, and Namecheap.
Pick a memorable and catchy domain name. Though you may choose any domain name, it is a good practice to have your name convey the blog’s purpose.
As far as possible, pick a domain name where you can get the same name as your social media handles too. Avoid confusing words that are commonly misspelt.
You might want to keep the domain privacy enabled. When you register a domain, your name and contact details are made public through the WHOIS system. With domain privacy, your personal information is replaced with the details of domain privacy company along with a forwarding email address.
We will connect the domain for use after purchasing web hosting. You will have to change the Name Server of your domain to point it to your web hosting space.
Get Web Hosting for Blog
Buy shared web hosting from any reliable hosting company.
Click the “Get Started” button (for the shared hosting plan). Check our recommendations for the best and cheapest web hosting, particularly for beginners.
While buying web hosting, provide the domain name that you registered when prompted.
Once you buy web hosting space, your hosting company will send you the account details along with the Name Servers for use with your domain names to be hosted with it.
Link Domain with Hosting
When you buy web hosting and domain name separately, the two aren’t connected. You need to point your domain to your web hosting space using the Name Servers provided by your hosting company.
Check your domain registrar’s help on how to update the Name Server details for your domain name.
Generally, you log in to your domain registrar’s dashboard and click on the domain to manage. It will take you to domain management page.
Look for the Name Server(s) option. Your hosting company will provide at least two name servers. Replace the old entries with those provided by your hosting company.
Now, you need to wait for the change to get propagated and reflect across the globe for your domain to work properly.
Install WordPress
Login to your web hosting account using the control panel information provided by your hosting company.
Most web hosting providers have a one-click installation process for WordPress. To install WordPress, you will need to log in to your hosting account and navigate to the control panel. From there, select the WordPress icon and follow the instructions to install WordPress. You can also install WordPress manually for granular control.
Here are the basic steps for manually installing WordPress on your hosting.
- Download the ZIP file from WordPress.org. Upload the ZIP archive in the web server folder and extract its content. You will get a WordPress folder. Go into the folder, select all files and folders using Select All. Move the files to the root folder, outside the extracted folder.
- Create a MySQL database and a database user with all privileges / rights to manage the database.
- Create a custom email address and forward it to your primary address or set up the new address in your email client.
- Now, open your website in a browser, with or without www based on whether you want it in your blog address or not. If your hosting company provides free SSL, visit your website using HTTPS in the URL. Eg: https://yourwebsite.com. If you get an error, wait for SSL certificate to be issued and added to your hosting. It may take a few hours. When your website is available on the HTTPS URL, it’s time to install. You may install without HTTPS too. However, you will have to change the website URL to HTTPS later or you lose its SEO benefit.
- On visiting your website URL in your web browser, you will find the WordPress installation wizard page. Enter your desired details with MySQL and new email. Keep your username and password safely written or saved. Make sure to use a fully functional email address so that you can recover your password if you forget it.
- You have installed your WordPress blog.
Now you can find the default WordPress site when you visit your website URL in the web browser. You can access the dashboard of your WordPress site using the username and password you entered while installing.
Log into Your WordPress Blog
WordPress is independent of your hosting account. You can log in to your WordPress site and manage it independently. No need to access WordPress via your hosting account.
In WordPress, the admin dashboard section is available by appending /wp-admin/ or /wp-login.php to the website URL. Eg: https://mywebsite.com/wp-admin/ or https://mywebsite.com/wp-login.php
Replace example.com with your domain address and type the URL in your browser. You can log into your self-hosted WordPress using the username and password selected earlier.
If you forget your password, you can reset the same as long as your email address is valid.
Set Up Your WordPress Blog
One you have installed WordPress, it’s time to customize the blog and make it your own.
Familiarize yourself with the dashboard of your new blog site. Here are the main menus (in the sidebar) that you will be using to manage your blog and publish blogposts.
General Settings: In the Settings > General section, you can manage your blog name, tagline, administration email address, time zone, site language, date and time format options.
Writing Settings: In the Settings > Writing section, you can manage the default category and post format for new posts. You can also set up posting via email, but not recommended.

Reading Settings: In the Settings > Reading section, you can manage the number of posts that appear in blog pages and archives index pages. In the past RSS feeds were important as the means of staying informed about latest articles on your favourite blogs. Now, RSS feeds have lost their glamour. As WordPress provides RSS feeds by default, change post in a feed to include summary.

One of the important settings is the ability to set any page as your home page (the page that your site shows at the front). Under the “your homepage displays” option, the default selection is to show latest blog posts. You can choose your own page too.
If your blog is not ready, you can set the search engine visibility to discourage search engines from indexing your site. (You can let Google index your blog even if still under development. No harm, unless you know some reason.)
Discussion Settings: In the Settings > Discussion section, you can choose how the comment and trackback system on your blog works. You can disable comments for your blog or restrict comments to fresh posts. You choose how comments are moderated – manually or not.
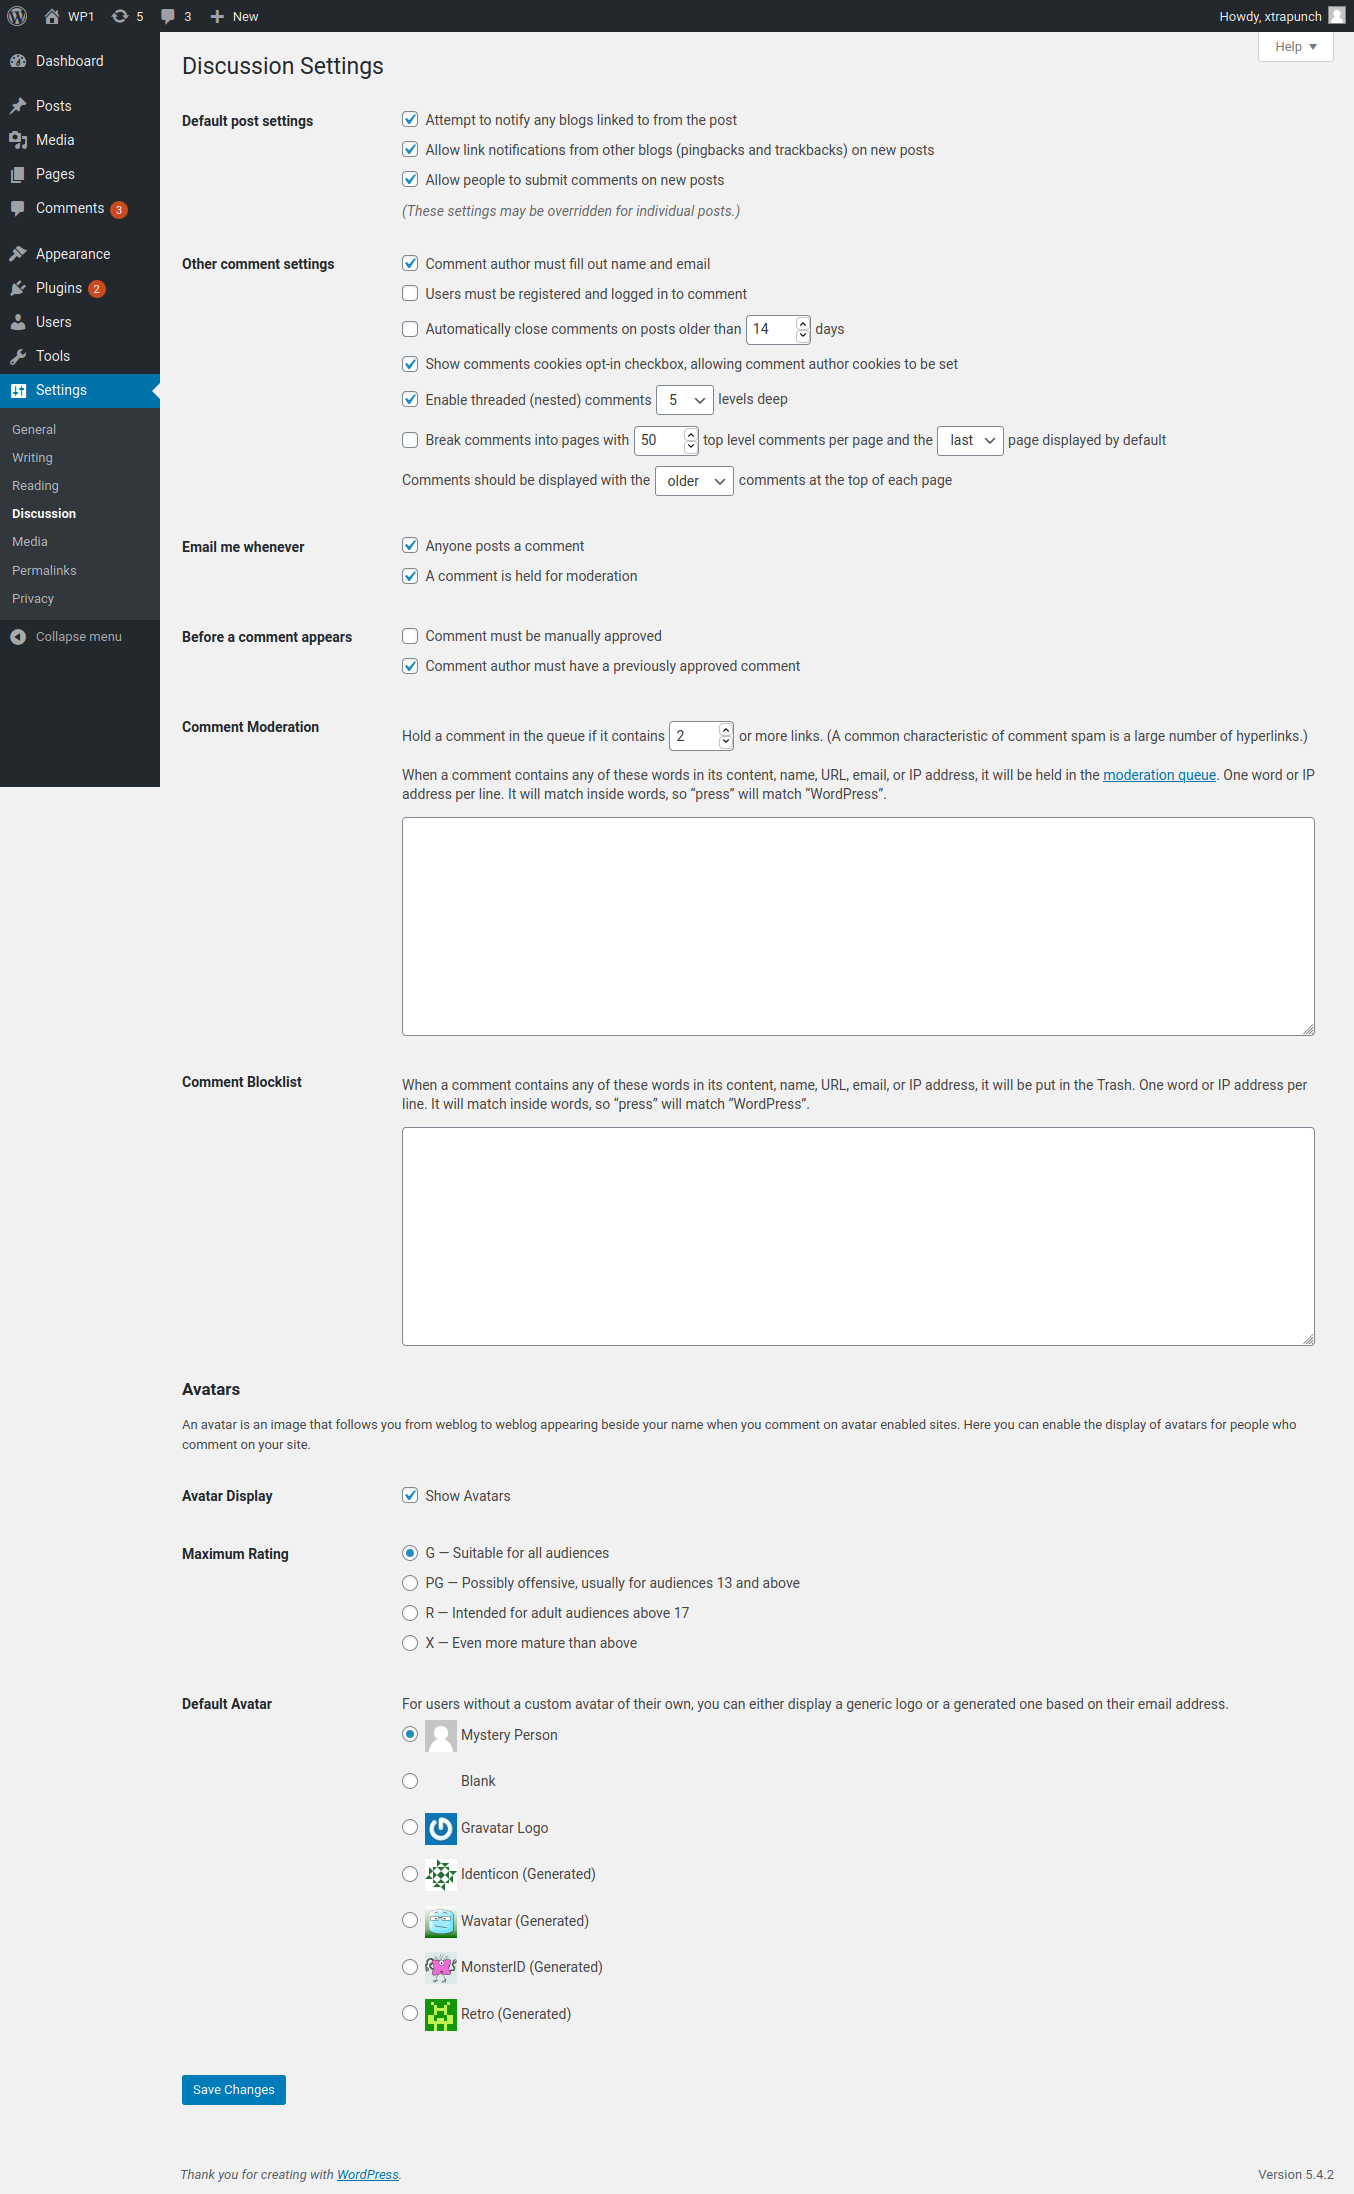
WordPress uses Gravatar to display avatar images for both users (of the site) and commenters. The image is shown if the email address associated with the user has an avatar set up with Gravatar. Similarly, if the email address submitted with any comment has a Gravatar linked, it will be shown. If the email does not have a custom avatar, it will show the default image.
Permalinks Settings: WordPress has the ability to create a custom URL structure for your posts. Custom URL improve SEO and aesthetics. A number of tags are available, and here are some examples to get you started.
Privacy Settings: With European Union GDPR, cookie consent and strict privacy requirements across various countries (including the US), you should define privacy policy page here. WordPress can create a privacy policy page with basic content. You can customize it.
Customize the Look & Feel
A default WordPress installation lacks personality. By customizing the blog’s appearance, your blog comes to life with a unique persona of its own.
Appearance Settings: In the WordPress dashboard, you will find the Appearance menu in the sidebar. This menu section holds the setting pages for themes, widgets, menus, header, background and more.
Install or Manage Themes: WordPress allows use of themes (design templates) to customize the look and content presentation. When you visit Appearance > Themes, you get a list of all the installed themes, including the active theme. You can switch to any existing theme, or install a new theme using the “Add New” button at the top.
The theme installation page has thousands of free WordPress themes displayed from the official repository. You can browse through the themes, check the demo and install it on your site. After installing a theme, you can preview it live on your blog.
If you have a WordPress theme ZIP file, you can install it by uploading it from the theme installation page.
Customize the Theme: After you activate a theme or within the theme live preview, you can customize the site appearance and theme options. Many themes include options to customize the layout, fonts, colors, sliders and more.
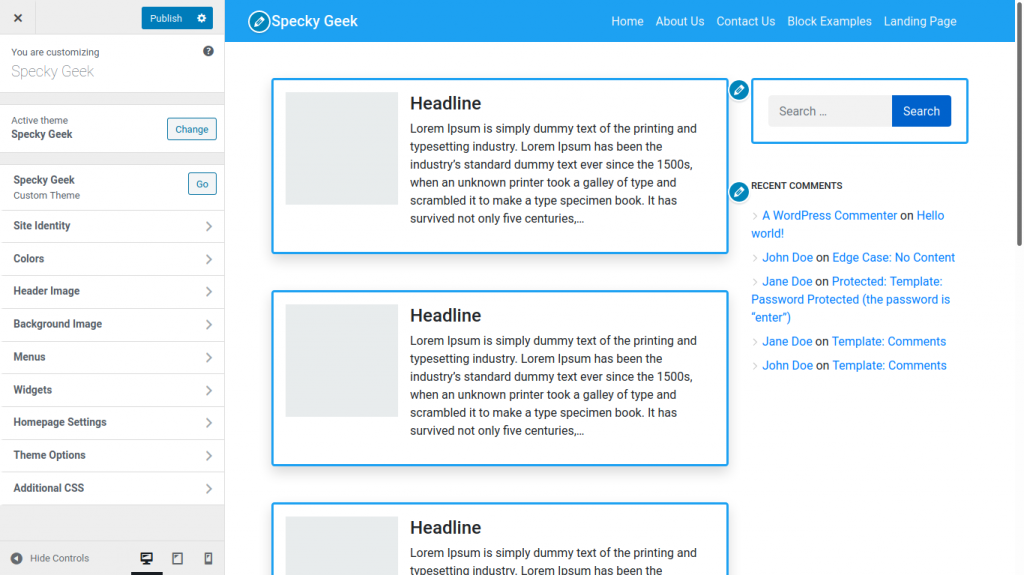
Go to the Appearance > Customize menu in your dashboard to access the appearance customization section with live preview of how your site will look. Once satisfied with the changes, hit the publish button.
Add your logo and icon: Within the Site Identity section of the appearance customizer, a logo for your new blog. Don’t forget to upload the website icon that appears in browser tabs, bookmark bars, etc. You can create logos using free online tools.
For your website icon, you can use any relevant image or icon. If you don’t upload a site icon, WordPress will show its own logo. So, don’t forget to upload one.
Install & Manage Plugins
WordPress comes with the ability to add plugins, which are scripts that add custom functions and features. Plugins help extend the functionality of WordPress. With a huge WordPress community, there are thousands of plugins that enhance the blog platform.
There are plugins for contact forms, SEO, website caching, selling products, etc.
You can manage and install plugins using the Plugins settings in the dashboard.
To install a plugin, use the Plugins > Add New menu. Like themes, you can browse through a huge list of free WordPress plugins from within your site. You can also upload a plugin ZIP file using the Upload Plugin button.
Here are some recommended plugins for various features that you should install on your WordPress blog.
- Contact form plugins: Contact Form 7, Ninja Forms
- Search engine optimization plugins: SEOPress, Yoast SEO, All in One SEO Pack, Rank Math
- Website optimization plugins: Autoptimize, WP-Optimize
- Website caching plugins: WP Super Cache, WP Fastest Cache
- Cookie & privacy policy notice plugins: Cookie Notice
With strict privacy and laws, your blog must inform users that your site uses cookies for complying with the European Union GDPR cookie law. You also have to provide a notice regarding privacy policy consent for complying with the California Consumer Privacy Act.
How to install plugins? Simply search using the plugin name in the installation page, and click on the install button. Once installed, activate the plugin to use.
Uninstall & Delete Unnecessary Plugins
Often the custom WordPress blog installations have plugins that you don’t really need. In the plugins page, go through the list of activated plugins. You can deactivate (and subsequently delete) all the undesired plugins.
Many hosting companies install and activate some plugins when you use the auto-installer. Deactivate and then delete all the pre-installed plugins. Akismet, Hello Dolly & Jetpack are some of the plugins that you should delete (at least until you know what you are doing).
Choose Permalink (URL) Structure
Permalink, or permanent link, is the URL assigned for your blog posts. For aesthetics, usability and SEO, it is important to have the right URL permalink structure.
From search engine optimization point alone, your URL should give an idea of the content to expect on the page. Hence, the URL structure should include post name (or keyword slug).
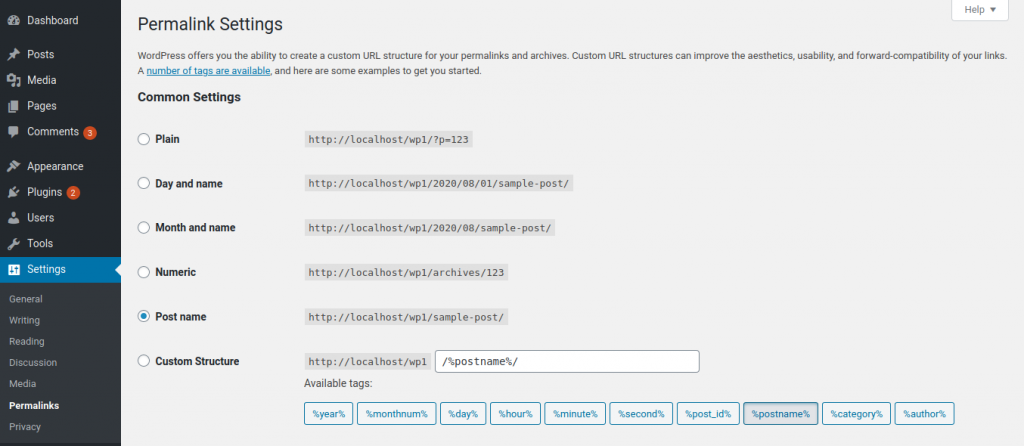
By default, WordPress uses ugly permalinks with a query string.
Default permalink: http://example.com/?p=123
For blog and small websites, the website permalink structure should be set as “post name”.
Post name permalink: http://example.com/new-york-trip
When the permalink structure is set as post name (or any other structure with name), you can customize the URL slug (the hyphenated phrase) via the post creation and editing page.
Here are a few things to do with your brand-new blog.
- Log in to WordPress dashboard
- Add a tag line for your blog in the Settings page.
- Choose the right Permalink structure in the Settings -> Permalinks page.
- Delete the dummy post & page in the Post & Page sections.
- Add a nice “About” page for your blog via Pages -> Add New.
- Change the look of the blog, go to the Appearance -> Themes page.
- Add plugins for SEO, Contact form, etc.
- Write your first blog post via Dashboard -> Posts -> Add New.
Create Your Custom Email (Free)
For professional blogging, you need your custom email address too.
With most good shared hosting, you can create your own email accounts with your domain name. It isn’t required, but it does make you look way better. It’s 100% free, provided you know how to create it.
Web hosting companies try to sell your email services (and Google Workspaces). You can create and manage custom email accounts for free.
Shared hosting can be sometimes used for spam emails. If your hosting server is abused, your emails created and sent via it can end up in spam or not delivered at all. A dedicated IP (Internet Protocol) address and a dedicated server is required to fix this issue. Too costly for now.
Most shared hosting companies provide cPanel, which is the most popular web hosting manager.
In the cPanel, you will find a huge list of settings and tools, neatly categorized under sections. Some of the settings that you find here include file manager (upload and manage your files), database, email, FTP, etc.
Here’s how to create custom email address for free in Bluehost.
- Log in to you hosting to open cPanel
- In the cPanel dashboard, locate the “Email” section
- Click on the “Email Accounts” icon / link
- All email accounts on the hosting will get listed on the next page
- Click on the “Create” button to add new email account
- Now, select the domain (if you have multiple)
- Enter the desired email address / username (eg: contact, info, alice)
- Generate or select a strong password
- Hit the create button, and done!
Once you have created the email address, you can access the email via the webmail using the password you chose earlier. Ordinarily, it is available at https://example.com/webmail/
You can also use this email address in your email client – Outlook, Thunderbird, etc – on your computer.
Alternatively, you can forward all emails coming to this address to your Gmail or existing primary email account.
Here’s how to forward custom email address in cPanel.
- Log in to hosting dashboard to open cPanel
- In the cPanel dashboard, locate the “Email” section
- Click on the “Forwarders” icon / link
- All existing forwarders get listed on the next page
- Locate “Create an Email Account Forwarder”
- Click on the “Add Forwarder” button
- On the next page, select the domain (if you have multiple)
- Enter the email address / username to be forwarded (eg: contact, info, alice)
- Enter a valid email address in the “Forward to Email Address” field
- Hit the Add Forwarder button, and done!
Don’t forget to send a test email to the forwarded email address and verify that the forwarded is working properly.
Adding Blog Posts & Pages in WordPress
WordPress has two content types by default: posts & pages.
Posts are regular blog posts, intended to be shown in a chronological manner. Latest blog posts are shown at the top. Every new post pushes other posts down.
When creating a blog, you publish content as (blog) posts. All your posts are available via the blog page and various archive pages.
Posts are organized in categories. You should structure your entire blog within categories for ease of accessibility and user experience. Don’t have dozens of categories. Think of categories as departments in an office. Create your categories based on your blog niche.
You can add tags to posts. Tags are unstructured form of content organization. You can add tags to your posts based on immediate requirements. These are more like product labels. Unlike categories, tags are optional.
In contrast to posts, pages are designed to be like web pages of static websites. They exist within the website, but independent of other pages and the rest on the blog.
When you create a page on your blog, it remains accessible only via its assigned web address. Hence, you need to provide a link (in menu or page) to access it. There is not automatic discovery method for pages.
Pages are generally used for content not part of the standard blog stream, such as you blog’s introduction (about), terms, privacy, contact form, landing pages, etc.
Content Strategy for Blogging
Once you have your blog created, prepare a content strategy.
Brainstorm all the content ideas for your new blog, and make a list of articles. Prepare a schedule for your blog posts.
Before you make your blog public, you should have 5-10 blogposts ready for publication. Start by publishing one blog post a day for the next five-ten days.
Make sure that your content meets the following:
- Minimum 300 words
- Use images, graphics and videos whenever possible
- Link to authoritative resources (website, articles)
- Content is organized into sections with sub-headings
- Your content is easy to read & informative
- Avoid long sentences
- Beak your content into small paragraphs
- Provide visual relief by inserting headings and multimedia
Generally, long-form articles that provide comprehensive information tend to perform better. Make your article an interesting read.
Follow a schedule for blog posting.
When you have a blogging schedule, your readers know when to come back for new content. Let your readers know that your publish one blog post daily, one each week or whatever schedule you follow. Your readers can then visit your blog to discover new articles.
Blog Promotions & SEO
Don’t just start a blog and publish your articles. You need to promote your blog and help potential readers discover it.
Without a blog promotion and marketing plan, your blog is not going to succeed. Apart from publishing awesome content, you will have to put a lot of effort in marketing your blog.
Social Media
Social media is one the best tools to promote your blog for free. You should create social media presence for your blog.
Create a Facebook page for your blog, and get Twitter, Instagram, Pinterest and Linkedin accounts for your blog. Each time you publish something on your blog, share it on social media.
Try to interact with fellow bloggers by following them on social media. Engage with people on social media.
Blog Comments & Forums
Start following other bloggers in your niche. Engage with them in a constructive manner. You can not only leave comments on their blog posts, but also connect in a more personal manner via email and phone.
To promote your new blog, you should consider joining niche forums too.
Search Engine Optimization
Google (and other search engines such as Bing) bring free organic traffic for blogs.
Search traffic quality can be considered better as the visitor is already looking for the product, service or information.
Learn about search engine optimization (SEO). Don’t forget to read our Search Engine Optimization Guide.
To start with, install an SEO plugin on your WordPress blog. Most SEO plugins (Yoast SEO, SEOPress) also provide you tips to improve your post. Don’t ignore them when you are just starting.
Track Your Blog’s Performance
Install Google Analytics code on your blog to monitor the number of visitors, traffic source, pages viewed and much more.
Also, submit your blog website to Google Search Console and Google Webmasters for better managing your blog. These free Google tools can help you monitor the health of your blog and keep a tab on your search rankings in Google too.
That’s all you need to know to start your blogging journey. Get started with blogging and don’t stop learning.
Do share your blogging experience with Specky Geek. If you need any help with creating your blog, don’t hesitate to connect. Drop an email to pritam@speckygeek.com. We can also install and manage your blog (for a small fee).