
Starting a blog doesn’t require a big investment. With Blogger, you can start your own blog without spending a penny on web hosting. You just need to register a domain name and link it to your Blogger (BlogSpot) blog.
Let’s learn how to create a blog on Blogger (Blogger.com by Google) with your own custom domain name.
Blogger.com is a popular blogging platform owned by Google. You can use it to create and manage blogs for free. To create your blog on Blogger, you sign up for a free account (or use your existing Google account) and choose a unique subdomain name. It gives you a free blog with a unique subdomain (eg: myblog.blogspot.com) as the web address.
When you need a blog, Blogger.com is a great place to start. However, it’s not ideal for those looking to grow their blog into something substantial. If you are looking for a business blog or want to turn your blog into a business later, you need complete control.
A free blog on Blogger.com accessible with your own domain name is the right answer.
Back in 2010, Specky Geek started as a Blogger-hosted blog with a custom domain name — speckygeek.com. It didn’t stay there long, but Blogger helped me start when I hesitated spending money on web hosting.
What is a domain name? A domain name is the unique web address that is used to reach any website. Eg: example.com, speckygeek.com, google.co.in. What is a subdomain? A subdomain is like a section of a domain. For example, in the web address www.google.com, www is the subdomain of google.com. In blog.speckygeek.com, the subdomain is blog. A domain can have any number of unique subdomains.
Blogger (or BlogSpot) is the best platform to start blogging like a pro with little money. It’s free, easy to use and allows template customization. It allows you to use your domain name with your blog. That’s why many professional blogs are hosted on Blogger.

Why Custom Domain for Your Blog?
A blog set up on a custom domain such as www.myblog.com sets you apart from the crowd of bloggers using free services, and portrays you as a more serious blogger.
By using a custom domain name with your Blogger blog, you can create a more professional and branded image for your blog. This helps establish your identity and attract more readers. Additionally, a custom domain makes it easier to remember your blog’s name and access it directly through search engines or by typing the website URL address in a web browser.
- Using your own domain gives you more control over your blog.
- You are not dependent on the platform.
- You have the freedom to move the blog to your own web hosting server once it grows big, without any impact on your website traffic or visitors noticing the change.
- Professional and branded image for your blog.
A custom domain brings the freedom and ownership of your website as you can create a backup of your blog and use it to host one any other platform at any time.
Creating Blog with Blogger & Custom Domain
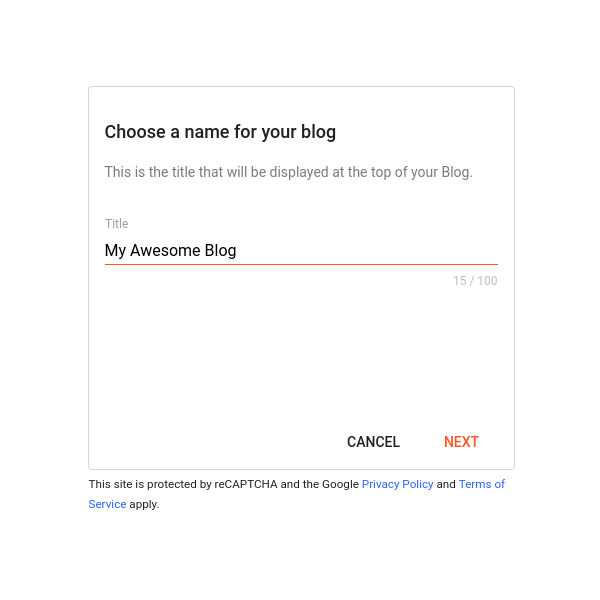
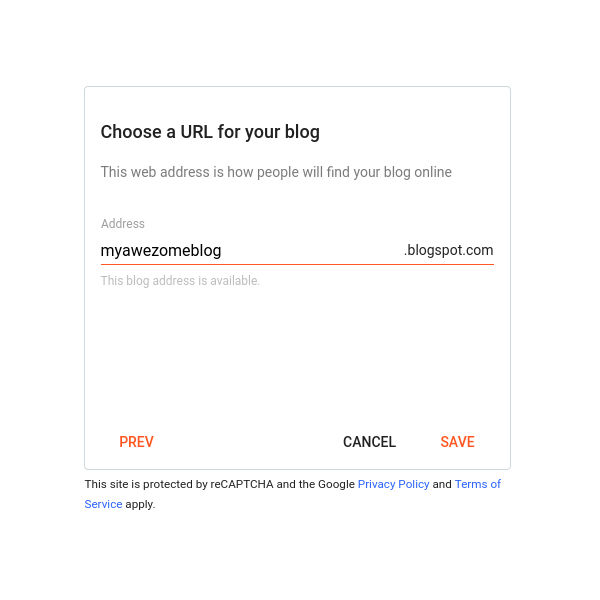
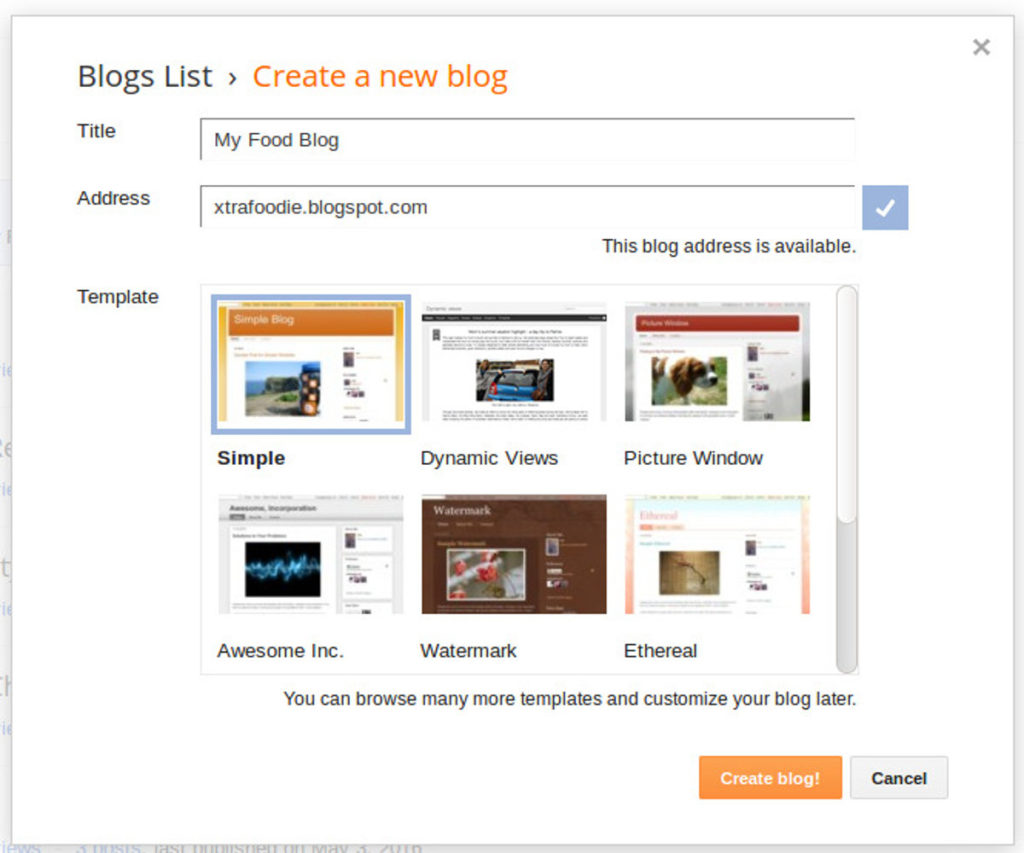
Step 1: Create your Blogger blog
First, sign up with Blogger and create a blog. You can use your existing Google account or create a new one. If you already have a Blogger blog, head over to the next step.
Step 2: Register your domain
Now, get a domain name of your choice. You can register a domain name from Godaddy, Namecheap or a domain registrar of your choice, or get it though Blogger/Google Domains.
Registering your though Google Domains will spare you the step of linking your domain name with your blog. However, I prefer buying domain from a service provider of my choice.
After the domain name is registered and becomes active, we need to link the domain to our Blogger blog.
Step 3: Set up a custom domain with Blogger.com blog
Once you have your Blogger blog and the domain name is registered, it’s time to link the domain with the blog.
Here’s how to set up a custom domain for your Blogger.com blog. This step is not required for those who have registered their domain with Google (available in select countries). You can create a Blogger blog directly on your Google-registered domain.
1) Log in to Blogger.com
2) Click on your blog name at the top-left to select the right blog and reach its administration dashboard (required if you have multiple blogs).
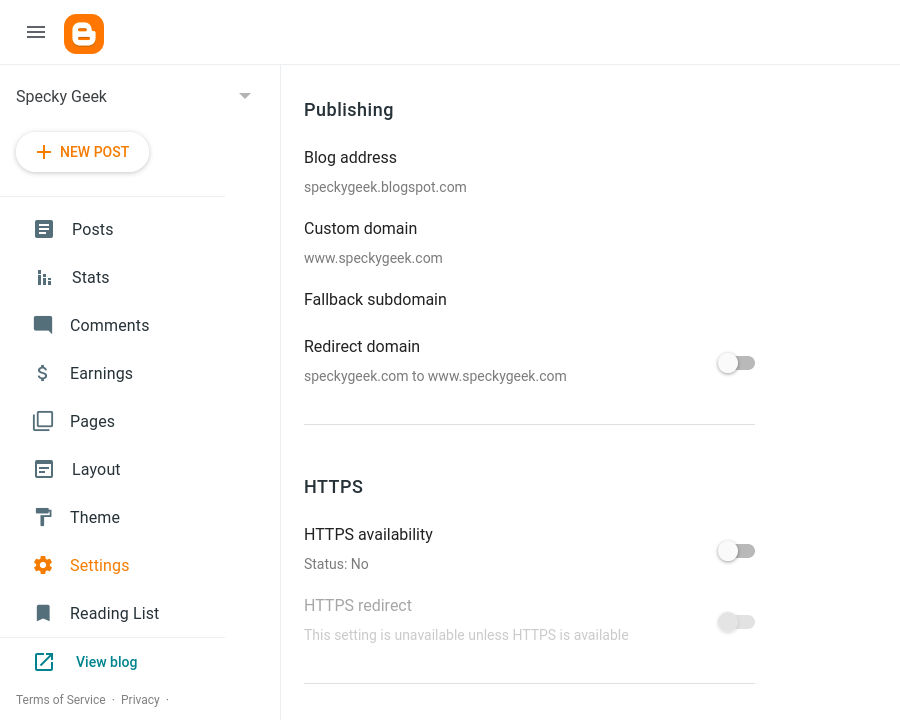
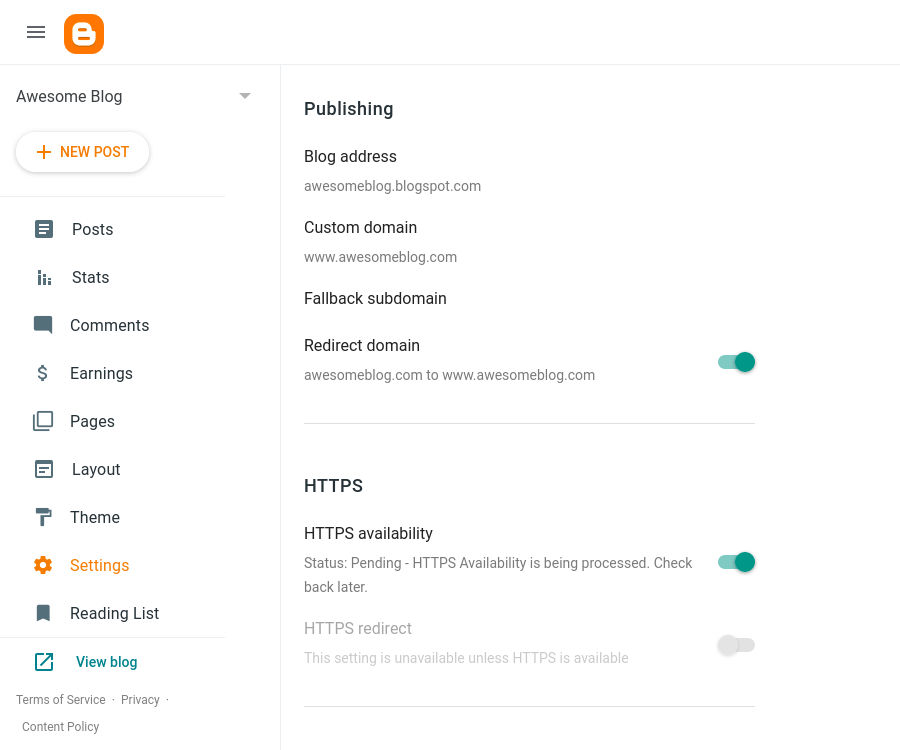
3) Go to the Settings page using the navigation menu at the left. Now, scroll down to the Publishing section on the page to link the custom domain. Click on the “Custom Domain” link.
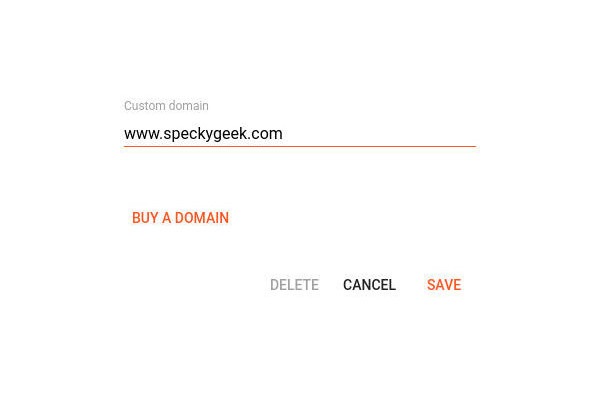
4) Enter the custom domain name with www, eg: www.myblog.com and hit Save. Blogger’s custom domain name option works only with a subdomain such as www. Blogs may not be hosted at naked domains (ex: myblog.com). You can add a top-level domain (www.myblog.com) or subdomain (blog.myblog.com).
5) When you try to register your domain in Blogger, it will fail and display an error message with required settings and instructions. You need to add two CNAME entries.
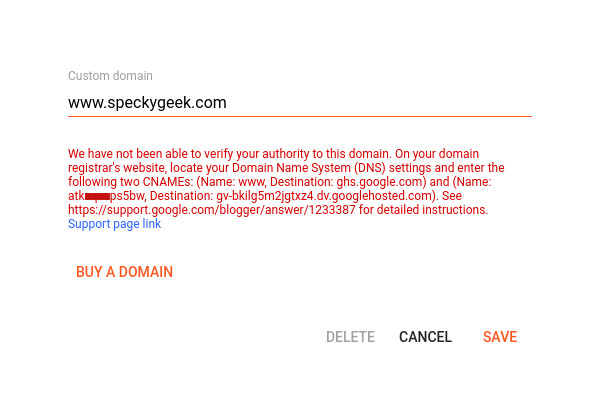
- Add CNAME www with ghs.google.com as the destination
- A security CNAME record with custom destination in the error message.
| Name / Label / Host | Destination / Target / Address / Points To / IP Address |
|---|---|
| www | ghs.google.com |
| hqghn53h3cu | gv-thteuid7j42fg.dv.googlehosted.com |
If you are using another subdomain instead of www, you will have to add the CNAME for that subdomain with ghs.google.com as the destination.
6) Visit your domain registrar’s website to manage the domain settings, and find the DNS (Domain Name System) settings in the control panel. Delete any existing CNAME entries.
If your domain is registered through Godaddy, read the instructions on adding a CNAME record in DNS here. For other registrars, check their support for the instructions.
7) Once the CNAMEs provided by Blogger have been added to your domain, wait for the new CNAMEs to propagate and become effective, which may take a few minutes to hours.
8) Go back to Blogger and repeat the same process of adding the custom domain. If your domain name is not ready, you will get the same error message. Try after a while.
9) When the CNAMEs have been set up properly, Blogger will link your blog with the custom domain name. Visit your blog by typing your domain name in your web browser (Google Chrome, Mozilla Firefox, Opera, etc).
Your blog is now available on a custom domain. However, don’t just stop yet. You need some additional settings to make it work optimally.
How the CNAME records work in Blogger?
When Google requires you to add CNAME records for your blog, it is requesting you to point your blog to its servers.
First, you have to create CNAME record for the blog address you selected and add ghs.google.com or ghs.googlehosted.com as the destination.
For example, if you selected blog.myblog.com, you need to add a CNAME record for the “blog” subdomain with the destination ghs.google.com. When you select www.myblog.com, you add a CNAME record for “www” with the destination as ghs.google.com.
Second, Google requires that we add a CNAME record for security verification. When you try to register your domain in Blogger, it displays two security tokens. You’ll need to create a second CNAME record to associate the short token (example: hqghn53h3cu) to the long token (example: gv-oc7x5cdddqsrol.dv.googlehosted.com).
Once you have added both the CNAME records, save and wait for the changes to reflect. The DNS settings are propagated across the servers globally, and changes to DNS records may take up to 48 hours to take effect.
Redirect Your Root Domain to Your Blogger Blog
With Blogger, your blog is available on a subdomain — www (or other). It doesn’t connect the root domain with your BlogSpot blog.
When your blog is available on www, the non-www version is also expected to show the same. However, your root domain(eg: http://myblog.com) will show an error or a different page determined by the namesever settings for the domain.
You need to fix this by redirecting the naked domain to your blog.
How to fix naked domain redirect?
As you are using the www subdomain for your Blogger site, you also need to point your root domain (such as myblog.com) to Google servers.
Step 1: Point your root domain to Google servers
Add A Name Records for your domain to be linked with your Blogger blog. A records point to an IP address where your website is hosted.
To add A name records, go to the DNS settings page for your domain name in the registrar dashboard. Now, add the A name records for the root domain (naked domain) with the following IP addresses as the values.
| Name / Label / Host | Destination / Target / Address / Points To / IP Address |
|---|---|
| @ | 216.239.32.21 |
| @ | 216.239.42.21 |
| @ | 216.239.52.21 |
| @ | 216.239.62.21 |
Step 2: Redirect your domain
Once you have pointed your non-www domain to www, it’s time to make the change in the blog’s settings within Blogger.
In the Settings page, go to the Publishing section. Below the Custom Domain option, you will find the “Redirect Domain” option. Activate the toggle on Redirect domain to point the naked domain to the subdomain.
Google shows 404 error page? Many bloggers get a 404 error page from Google when visiting their domain without www. You have added the CNAME and A records correctly, but you haven’t enabled the domain redirection. Go to the settings page, and toggle the redirect domain switch. Wait for a while and you will have the root domain redirected to the www version.
Alternatively, you can also redirect the root domain (without www) to www with your domain registrar. Your domain registrar’s help/FAQ should be able to provide you the exact instructions on how to redirect naked domain to www subdomain.
Turn on HTTPS/SSL for SEO: Enable the HTTPS option too in the settings page. First toggle the HTTPS availability switch to make the blog available with SSL. Once your HTTPS setting is ready, you should then turn on the HTTPS redirect.
What is a Domain Name?
A domain name is a human-readable and easily memorable web address. It is the address used to reach any website easily. Eg: speckygeek.com is a domain name.
If you purchased example.com, then example.com is the root/naked domain. Your registrar will automatically configure www.example.com. Here www.example.com is an alias or sub domain of the domain example.com. These two are different addresses and can point to different places (web hosting space).
For search engine optimization, one should not have the website accessible on both the domain and the www subdomain. You should choose one, and redirect the other to it. Normally, you can opt to point your www alias to main domain, but not if you want to use Blogger’s custom domain facility. Here you should do vice versa – redirect non-www to www, where your Blogger blog is hosted.
What is a CNAME Record?
CNAME or canonical name is a record which points one sub domain (only) to another. In our case, our www sub domain will point to ghs.google.com, a Blogger sub domain.
Different domain registrars have different ways of getting it done. Log in to your domain provider’s site with your username and password to access your admin panel. Follow the instructions of your registrar to create a CNAME record. With some registrars, you might have to place a request for creating a CNAME entry.
Send this request to your registrar through email or their messaging service, as required. “Please create a CNAME entry for my domain www.myownblog.com pointing to (destination as) ghs.google.com”
Don’t forget to forward your main domain (myownblog.com) to its www sub domain (alias) (www.myownblog.com). For this, you will have to use URL forwarding feature provided in your domain provider’s admin panel.
Google’s starter guide on search engine optimization says:
“To prevent users from linking to one version of a URL and others linking to a different version (this could split the reputation of that content between the URLs), focus on using and referring to one URL in the structure and internal linking of your pages.”
Your Blogger blog is available on your custom domain name. However, it might take some time for the changes to reflect globally. Customize your Blogger blog with free templates available and start impressing the world with your great ideas.